
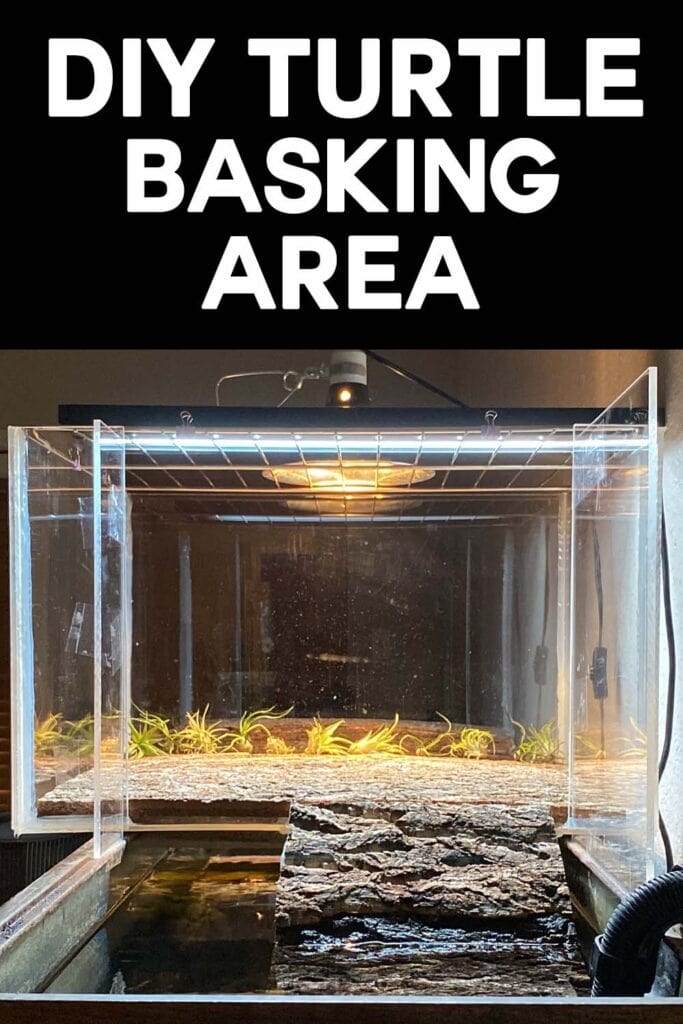
DIY Turtle Basking Area

I recently shared a video of our Red Eared Slider tearing apart her new decorations, and I was overwhelmed with the response. Tons of folks loved watching her go gremlin on all the new air-plants I had bought her, but even more messaged me asking how to make their own DIY Turtle Basking Area & Ramp. I am always happy to help get folks crafting, so I thought I would walk you through the process of making Scooter’s new digs.
DFWCS participates in the Amazon affiliate program, but DFWCS is in no way associated with Amazon or the items listed in this post. This post may include affiliate links that support DFW Craft Shows at no additional cost to you.

Why Build Your Own Turtle Basking Area?
We have built our own Custom Turtle Basking Areas twice now. The first DIY Basking Platform was over 11 years ago when we had just moved Scooter to her 75 gallon tank. The second build was our current upgrade that I am sharing with you today. There are a lot of reasons to go with a custom build for your Turtle Basking Area:
- There are little to no satisfactory commercial options available.
- You have a specific vision in mind.
- Your tank is an unusual size.
- Your basking platform needs to be specific dimensions.
- You enjoy a good DIY project.
I had the privilege of working side-by-side with my dad on both of our Custom Basking Platforms and it was a blast. Full disclosure: My dad is a mathematical, engineering genius. If you have one of those in your life, I highly recommend recruiting them for this project and watching their amazing brain at work. It’s the perfect project to cultivate some serious admiration for the architectural experts in your life.
As I mentioned before, there are a few commercial options available for Turtle Basking Areas, but they all have their shortcomings. Some commercially made Basking Platforms have unusable ramps, while others are too small for long term use. A lot of the pre-made Basking Areas are too short, putting your heat lamp far too close to your turtle friend and therefor risking injury. Rather than re-engineer an existing product, it makes good sense to build a Custom Turtle Basking Area that will be safe, sufficient, and long lasting.
Supplies for DIY Turtle Basking Platform
Making your own DIY Above Tank Turtle Basking Area is not nearly as difficult as it looks, but it does require some specialty supplies, precision, and time. Please do NOT think that this is one of those DIY crafts that will ultimately save you money on your turtle’s enclosure. These DIY supplies are not as cheap as toilet paper rolls and shoe boxes, but the result is a gorgeous Basking Box that will last your turtle many, many years. Our previous build made it over a decade before we decided to upgrade to something larger and more accessible.
- Clear Acrylic Plexiglass, 1/4″ thick extruded
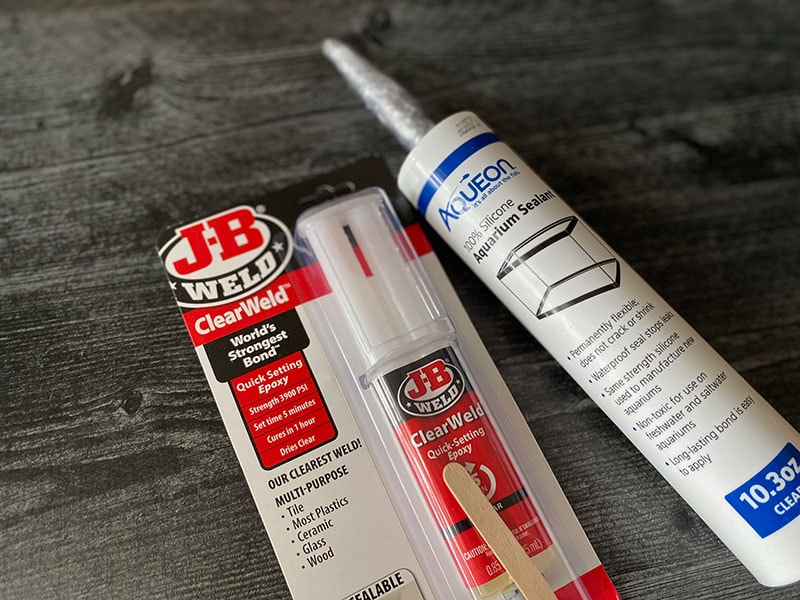
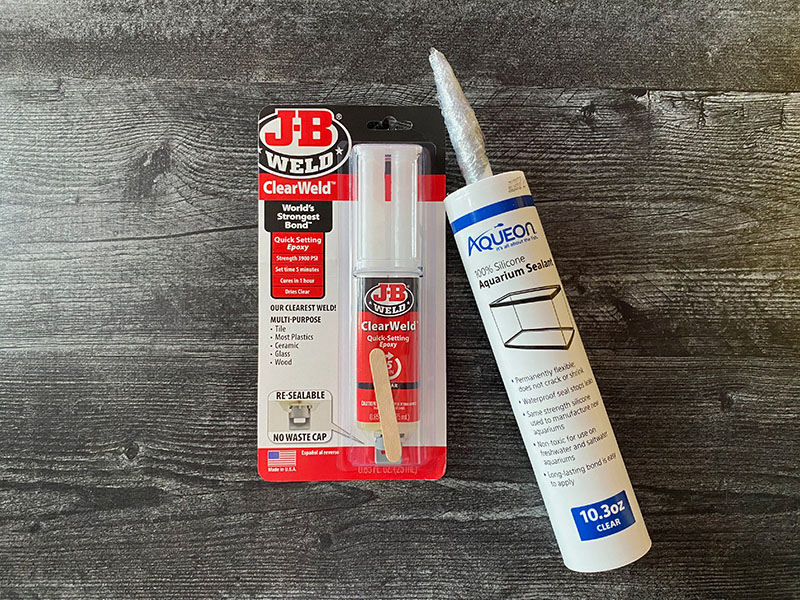
- JB Clear Weld (Syringe Style)
- Extra JB Clear Weld Syringe Tips
- Cork Bark Tile
- Aquarium Safe Silicone Sealant
- Caulk Gun
- Heat Gun (or something similar)
- Level
- Layout Tool

Clear Acrylic Plexiglass
Plexiglass comes in all variety of sizes and thickness. If you have the tools to cut your plexiglass, you can buy large sheets and save yourself some cash. If you do not have the tools or ability to trim your own plexiglass, you can order pre cut plexiglass sheets online and at some local hardware stores.
For this project, we are working with extruded, clear acrylic plexiglass that is 1/4″ thick and cut into various sizes measured to our desired Basking Box size.
Tip: Shop around for your precut plexiglass. Some stores will charge per cut, whereas other stores may allow 2 or 3 cuts for a single price. If you are working with standard sizes, you may not need many custom cuts. We purchased our plexiglass from buyplastic.com and received a custom quote for the cuts we needed, which was considerably cheaper than the retail prices listed online.
What Sizes?
The size of your plexiglass will obviously depend on the size of your tank. Scooter is living in a 75 gallon aquarium, so we had about 18.5″ in width to work with. Rather than make her Basking Box this exact size, we choose to overhang our DIY Turtle Basking Area by approximately 3″ on either side. The idea was to give her a little extra room to move around and therefore give her new Basking Platform a little more longevity. Our previous Basking Box was measured perfectly to sit right inside the lip of the aquarium, so this is certainly another option to consider.
- Base Platform: 24″ X 20″
- Walls: 15″ X 20″
- Mini Walls 15″ X 3″ (optional)
- Extension Walls: 15″ X 12″ and 15″ X 6″
- Ramp: 15″ X 10″
We made the walls 15″ tall to put Scooter’s heat and UVB lamps approximately 12″ above her shell for optimal UVB absorption. We also ordered smaller pieces of acrylic plexiglass to use as mini walls to close off the overhang and extra acrylic for the ramp. We wanted our ramp to only take up about half the width of the tank, so we measured that accordingly.
Plan for Mischief
Turtles are amazing escape artists, so you might as well plan for that. If you will notice in my pictures, I have 2 extension walls that extend beyond the box alongside the aquarium. That is because without those walls, Scooter will make it her life goal to climb out of her tank. And she did it once.
So… yeah… if you are overhanging your Basking Platform and using mini-walls, you will need those extra extension walls to be safe. If you are going with a simpler build, you can choose to either extend the walls farther by ordering two long pieces of plexiglass for the side walls OR order additional walls and attach them with something like these.

Prepping your materials
Once you have all your plexiglass cut to the sizes you need, the first thing you will want to do is peel off the edges of your pieces where you will need to glue them. I prefer to only pull these pieces off so I can continue to protect the rest of the project while I work. Peel up, cut away the extra film, check that off your list.
Optional: If you are worried about the edges of your plexiglass that your turtle might physically encounter, now is a good time to sand and clean them up a bit. Or you can wait until the end, like we did, and then just hose down the finished box.
Next you will want to clean these areas, front and back, with rubbing alcohol. This is a very important step. If you do not prep and clean your plexiglass properly, you risk poor adhesion and may have to start all over.
Don’t ask me how I know. I do not want to talk about it. Just clean the stuff, okay? Clean it all at once, and then clean it again later, if you want. Clean clean clean.
Why Acrylic Glue and Silicone?
I have a confession to share with you. The first DIY Turtle Basking Area that we made was held together solely by aquarium safe silicone. It held up for 11+ years and it is still pretty solid. Why is this shocking? Because silicone is meant to bond glass to glass. It is not meant to bond acrylic to acrylic. When we built the first Basking Box, everyone told us it was going to fall apart. But it felt sturdy and there was no way we were starting over at that point… so we risked it. And it worked out just fine because we had thoroughly cleaned that plexiglass before we put the silicone on.
Bad News
As you might have guessed, we thought we would just do the same thing with our new Basking Platform. We bought silicone, completely forgot about the glue, and went to work. Then things started to fall apart. Literally. We quickly realized that we had forgotten to clean everything but one wall, and all those other walls just started separating terribly.
At this point, we had to pull all the silicone off and essentially start over. I’m not going to lie. That one hurt.
Good News
So I am going to highly encourage you to start this project off properly by using the right tools. Use the acrylic glue to bond your plexiglass. Use the silicone to make it extra safe for your pet. More details on this below.

Assembling your DIY Turtle Tank
Setup a table or flat surface somewhere outside for this first part. You are going to want to either build yourself a base to hold your pieces tightly in place OR use tape, clamps, and whatever MacGyver rig you want to keep the walls together for 24 hours while they dry. We started with the base and the back wall standing on top of the base. The first one is the hardest, after that, you have plenty of anchors to hold everything up.
Glue, glue, glue
Once your walls are in place and ready, you are going to use your JB Clear Weld to bond the plexiglass. Do this in a well ventilated area. I highly suggest buying the JB Clear Weld with syringe tip for an easy and precise application. The syringe tip mixes the epoxy together while you work, eliminating a couple of steps and a whole lot of mess. Definitely buy extra syringe tips though. They are only going to work for one use, and then you will have to take them off and toss them.
Another important bit of info: the packaging says this epoxy fully cures in 1 hour. This is not true. Give it a full 24 hours just like their other products.
Keep working until you’ve got all your main walls up, and then do a little dance! That was a balancing act, but you did it!
Tip: Use cling wrap to cover the tip of your used silicone and then secure it in place with tap. This will prevent your silicone from drying out between applications.

Note about Mini Side Walls
If you are allowing your DIY Turtle Basking Area to overhang the width of your aquarium like we did, your mini side walls can add an extra level of complexity. You have a couple of options here.
You can either very precisely glue your mini side walls on so that they sit down into the lip of your aquarium OR use something like these to snap your walls on when you are finished. There are similar products available at hardware stores as well. I opted for these little gadgets so that I would have flexibility on how my walls lined up with the edge of my aquarium, but also so I could remove the side walls if needed.
Cover your tracks
When it comes to animals, you can never be too careful. That is why I chose to cover my acrylic glue with aquarium safe silicone once the epoxy had fully cured. Grab yourself a caulking gun and use just enough silicone to bury your epoxy. You can do most if not all your box in one run depending on how you time it. This stuff smells like vinegar and isn’t nearly as spicy as the JB Weld, so you should be able to do it within the comfort and air conditioning of your home if you prefer.
Congratulations! You are now the proud owner of a custom acrylic plexiglass box!

DIY Turtle Ramp
When we worked on that first DIY Turtle Basking Area over 11 years ago, we made a few errors in our design for the DIY Turtle Ramp. First of all, we connected the Turtle Ramp to our Basking Platform with a flexible hinge. This hinge could not support Scooter’s weight, making it impossible for her to get out of the water because the ramp would collapse.
To compensate for our design error, we installed a heavy duty suction cup against the side of the tank, locked under the ramp, to hold the whole thing in place. This solution worked okay, but the suction cup fell off monthly and it was a real pain to fish out, clean, and re-attach. I always worried that we might not notice right away and leave Scooter stranded. Needless to say, I was VERY READY to leave the suction cup concept behind.
The other issue? As Scooter grew, she needed more of the ramp length in the water in order to climb up it. We kept trying more gradual angles for the Turtle Ramp, thinking it would make it easier for her to climb out, but this actually had the opposite effect. The more gradual the angle, the less of the ramp would be submerged. What Scooter really needed was for the ramp to be submerged MORE so she could float right up and heft herself out. These Turtle Ramp troubles were top priority in our new build.
The Solution
When we ordered our clear acrylic plexiglass for Scooter’s DIY Turtle Ramp, we made it extra long–15″ to be exact. Instead of using a flexible hinge and a suction cup, we were going to try our hands at bending the acrylic and making our own rigid angle DIY Turtle Ramp. And it turned out brilliantly, if I do say so myself!
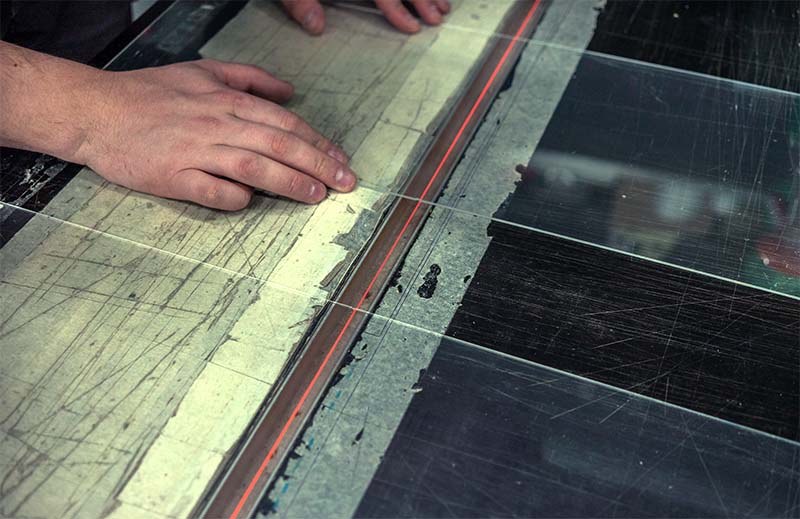
Heat Bending Acrylic Plexiglass
In order to create your own acrylic ramp, you are going to need a heat gun or something that gets similarly hot. I am sure there are lots of alternatives out there, but we had a heat gun on hand so that’s what we used. We measured out about 11″ for the ramp incline and left the rest of the plexiglass flat. That flat piece will be what we use to bond the ramp to the bottom of the Basking Platform later.
Make sure you remove the protective film before you start bending your plexiglass.
We clamped the acrylic down between a large piece of wood and my dad’s work bench, and then we started to heat where we wanted the ramp to bend. Heating the acrylic plexiglass took longer than we expected, but my dad just kept heating and slightly bending, heating and slightly bending. Don’t rush it or you risk cracking your plexiglass. Use some kind of angle to measure your incline as you work. Our ramp is at a 45˚angle.
Once you have the angle you want, hold your plexiglass in place for a few minutes while it cools down. You aren’t going to want to move it until it fully cools, but you won’t have to hold it in place after a few minutes.
I found this video on bending acrylic plexiglass incredibly approachable and helpful.

Planning and Attaching your DIY Turtle Ramp
Once your ramp has cooled and your box is fully cured and solid, you can carefully flip over your Basking Area and prepare to attach your ramp. Take a moment to consider placement and what will work best for your setup ad your turtle.
Placement
If you are designing your DIY Basking Area to sit within the lip of your aquarium, you are definitely going to want to watch where you are glueing this ramp. You want the Turtle Ramp to be inside of whatever your Basking Platform is sitting on so that your DIY Basking Area remains level.
Also consider your turtle’s usage and size. It was important to us that Scooter still have space to swim around her ramp or jump off of her basking area into the water. The only way that Scooter will lay her eggs is by dangling at the edge of Basking Area and dropping her eggs directly into the water. For these reasons, we inset our Turtle Ramp about 4″ from the right side, leaving her circus platform / swimming area clear on the left.

Adhesion
Cover the level part of your ramp in acrylic glue and then clamp it on to your ramp. Go easy on the amount of glue you use. It may leak out the sides and you do not want to accidentally glue your clamps to your DIY Turtle Basking Area. Give this ample time to dry before you silicone around the edges of your ramp. I would also add a bead of silicone across the top of your ramp where it comes into contact with your base, just in case any glue leaked in that area.

Substrate for your DIY Basking Area
There are many choices for substrate in your DIY Above Tank Turtle Basking Area, but my substrate of choice is Cork Bark Tile. We have been using this stuff for over a decade and it has never let me down. It is great for aquatic environments, and can be fully submerged, and is fairly indestructible. It offers a great grip on the ramp for easy scaling, and it looks great.
How to Prep Cork Bark Tile
Cork Bark Tile needs to be cleaned and prepared before you use it in your enclosure. You can do this either by boiling the cork bark until the water is no longer brown or soaking larger pieces of cork bark until the water stays clear. Change the water often to get an idea of how the process is going. This has never taken me long. Afterwards, I leave the cork bark outside in Texas for about 15 seconds and it’s dry. Okay, I am kidding. It probably took 10 minutes.
The soaking process is not only helpful with tannins, it will also help ensure a good fit. Cork bark expands when it gets wet, so you want a good idea of sizing before you start cutting things.
How to Cut Cork Bark Tile
Cork Bark Tile comes in a variety of sizes. For our use, I purchased (2) of their 18″ X 24″ tiles. These were not quite the right size for our base, so we cut an extra wedge out of one piece and used aquarium safe silicone to bond the two pieces together. You can cut cork bark with a Dremel, hacksaw, box cutter, etc. I even read that you can hold it down with a flat edge and snap it by hand, but I have not tried that one.
How to attach Cork Bark Tile
Cork Bark Tile can easily be glued with aquarium safe silicone. I have never bothered to glue the base piece down–it’s not going anywhere. But you will obviously need to glue your cork bark to your ramp, so bust that silicone back out and get ready.
Measure and cut a piece of cork bark tile to the size of your exposed ramp. Slather the back of the cork bark with silicone, and press it into place on the top of your ramp. Use clamps to hold your cork bark in place while the silicone dries for 24 hours.

Bask in the glory of you!
Now it is time for celebrating. You just finished a hefty project, fueled by love for your pet. Now that everything is dry and ready to go, you can install your new Basking Box and let your turtle check it out. Don’t be surprised if they spend a few hours pretending to be terrified of it. The next stage will most certainly be: destruction.
If your turtle is anything like Scooter, they will spend the next day trying to figure out how to destroy the ramp you just spent days building. If you added decorations, like our cute little air plants, they will also be subjected to your turtle’s scrutiny. Scooter has never been a fan of interior design, but she really has a knack for demolition. You can see her in action on the video below. 😒
@dfwcraftshows Part II: Destruction. This is exactly why we can’t have nice things. #reptiles #turtletok #turtles #redearedslider #redearsliderturtle #redearsliderlife #reptilepets #customenclosures #crafting #handmadehomemade #destructoturtle ♬ Funny Song – Cavendish Music
AFTER ALL THAT DISGUISED GRATITUDE, your turtle will start to settle in and enjoy their new Above Tank Basking Area. Scooter basks more than ever now. Watching her climb the ramp with such ease really warms my heart. A clear victory for everyone involved.

Additional Equipment and Resources
I’ve had a few people asking me about my lighting rig and other equipment for our red-eared slider, so I just wanted to take a moment to share that below.
Light Rack
I wanted something safe for the top of our DIY Turtle Basking Area that could safely support our lights without blocking too much UVB. I settled on a stainless steel oven rack. It was a complicated find for us because of the width of our Basking Area. If your Basking Box is less than 24″ wide, it should be much easier to find an affordable stainless steel rack for your needs. I used binder clips to secure the rack to the top of the Basking Area walls, and I even created a little fence around the binder clips just so they couldn’t accidentally shift.
Heat Lamp & Hood
UVB
- Zoo Med ReptiSun T5 HO High Output Reptile Terrarium Hood
- Zoo Med ReptiSun 10.0 UVB T5 HO Reptile Terrarium Lamp, 24-watt
Additional Equipment
- Aquarium / Basking Thermometer
- No Contact Temp Gun
- Fluval FX6 Aquarium Filter
- Fluval E300 Advanced Electronic Heater
Additional Resouces
If you are looking for more information on husbandry, other lighting rigs, etc, please check out Everything Turtles. The site has a ton of care guides for a variety of turtle species, and the Facebook Group is brilliant and fun.
Shoutout to Dad
I just wanted to give props to my pops for all the spectacular work he did on both the original and the new DIY Turtle Basking Areas. He did the vast majority of the labor on both Basking Platforms, and I am not exaggerating when I say I could not have navigated this project without him. He completed both DIY Basking Platforms with an infinite amount of patience and perseverance, even when everything started to fall apart (literally). Thank you, Dad. I had a blast working with you. ❤️

Originally posted on August 24, 2022.
share
16 thoughts on “DIY Turtle Basking Area”
Leave a Reply to Maci Worth Cancel reply


Hi, I'm Tania!
Thanks for stopping by DFW Craft Shows! Our blog is home to tons of creative inspiration, gift guides, tutorials, featured artists, and tips for small businesses trying to make their mark in the arts & crafts world.


I loved seeing your turtle videos so it was neat to learn how to do this!! Thanks for your always informative and amazing posts!
Love your basking area and would like to make one. Can you tell me how heavy this thing is? I will have to take it off of the tank every two weeks to do water changes and need something that is not too heavy and, since I have a 125 gallon tank, mine will probably be longer. 36″ maybe.
Thanks for sharing. Love your post.
Hi Barbara!
I’m not sure the exact weight on the basking box. It currently has a chonky turtle chilling in it, but I will do some weight lifting later this evening and see if I can get you a guess. Here is what I can tell you: I have removed the basking box once without issue when I needed to access the full tank. Every other time I have done a water change or tank clean, I just slide the basking box to one side, do my work, and then slide it to the other side and finish up. I hope that helps!
Hi There,
This looks amazing. We’re going to try and make it for our 8yr old red-eared slider, Donatella.
I have a few questions, if you don’t mind answering them:
What are the dimensions of the back wall? Are they 15”H x 24”W?
In what order did you attach the wall panels to the base? Do they all sit on the base like the back wall or are they just attached at the very edges? If so, how did you keep them in place while the glue was drying?
So excited to make this!!
Thanks!
Daniel
Hi Daniel!
I am happy to help. The dimensions for the back wall are exactly that, 15″H X 24″W.
We did sit all the walls on top of the base, and we started with the back wall so we would have something to anchor the other two walls against.
The first wall is ALWAYS the hardest, and we just make-shift a whole variety of things to hold it in place. We had stuff stacked on both sides of the first wall to hold it in place while the silicone dried. After that, we used a spare piece of wood across the open end, with two grooves in it, to hold the new walls in place while they dried. You can see it in one of the pictures above.
Really, it’s just whatever you can Macgyver together to give it stability while everything sets.
I hope that helps!
Thank you! That was very helpful.
One more question – since you sat all the walls on the base, did you have a 1/4” lip at the front because the back edges of the side walls were up against the back wall?
Thanks!
Daniel
Yes, we do have a bit of an overhang. I filled it with silicone for the mini-walls, mostly, but you could have them cut yours a little more exact if you don’t want to worry about that.
That was awesome to read and see. It is hard to find basking items this gives me ideas thanks
Hi Tiffany! Thanks for the kind note. I am so glad to hear that it helped.
Love this. I don’t understand how the ramp attached to the basking area. Did you glue it? If so from what point? Is it underneath or above or tip to tip? You say glue the flat part to the other part to f the ramp but I don’t understand that. Thank you.
Hi Lisa! Apologies for any confusion I may have caused. The flat part of the ramp is glued to the bottom of the basking box. We used clamps and wood to hold it togethe tight for the duration of its curing time. I added a picture above with a side view of the ramp and how it is attached, in case that helps. It’s right above the section called “Adhesion” under “Planning and Attaching your DIY Turtle Ramp.” Hope that helps!
Love this but one question. How this of plexiglass did you use for making the ramp?
The plexiglass is 1/4″ thick. I hope that helps!
Hello!
I have been looking desperately for a basking box design that I like and that would suit my turtle best, and this, is absolutely gorgeous! So firstly, thank you (and your dad) for this incredible build (and post!🙏)
Secondly, I would love to know, either where you got the dock, or how you built it…? I’m not trying to completely copy you lol, but this dock is exactly what I’ve been looking for and have failed to find/manage to build countless times.
Thanks:)
Thank you for the kind words, Harlie! The instructions for building the dock and basking box can all be found in the post above, unless I am misunderstanding your question?
Sorry for the confusion, apparently my phone was not allowing me to see the whole post!? But I can see everything now! Thank you for being so thorough, this will help so much! My sweet girl will love this!