
Recycled Paper Bead Kit by 4M Review [Paper Scraps Have Met Their Match]

The age old question of what to do with leftover craft supplies plagues almost every crafter, and our home is no exception. My kids love to keep every piece of scrap paper leftover from their art projects. Every. single. piece. When I saw the Recycled Paper Bead Kit by 4M, a light bulb went off. Suddenly, I had a great idea on how the kids could keep their scraps and use them too. It has worked out pretty well, and I am excited to show you how easy and fun using this bead maker has been.
First things first, I just want to let you know that I purchased this kit myself and did not receive compensation for this review. As always, I am here to share our honest opinions and experiences so you can decide which products might fit best into your own craft collection. This post may contain affiliate links and purchases made with those links may support DFW Craft Shows at no additional cost to you.

What’s in the box?
The Recycled Paper Bead Kit comes with nearly everything you need to get started making paper beads, including:
- Bead maker
- Handle
- Glue pouch (not pictured)
- Glue dabber
- Elastic string
- Decorative paper
What else do you need?
Though the kit comes with nearly everything you need to get started, there is one supply that you will definitely have to bring to the table: scissors. I think it’s safe to say that most households have a pair of these (though knowing exactly WHERE they are, however, is a whole other tirade). Still, there are a few other supplies might make your bead making life a bit more enjoyable, and those include:
- Other paper scraps
- Small plastic container for your glue (as seen above)
- Glue Pen
- Plastic Bottle
- Scissors or paper cutter
The kit comes with a glue pouch, and we found it easiest to empty this pouch into a small plastic container with a lid for continued use without worrying about it all drying up. The dabber was a fun little tool to use, but you have to remember to wash it off after each bead making session, or it’ll dry hard and be more difficult to work with.
After a few days, we opted to trade the glue dabber in for an Elmer’s Glue Pen. She just unscrews the lid, puts a little dab of glue on the paper, and then pops the lid back on. You can get a 3 pack for pretty cheap, and it’s a nice way to reduce the mess while increasing your precision.
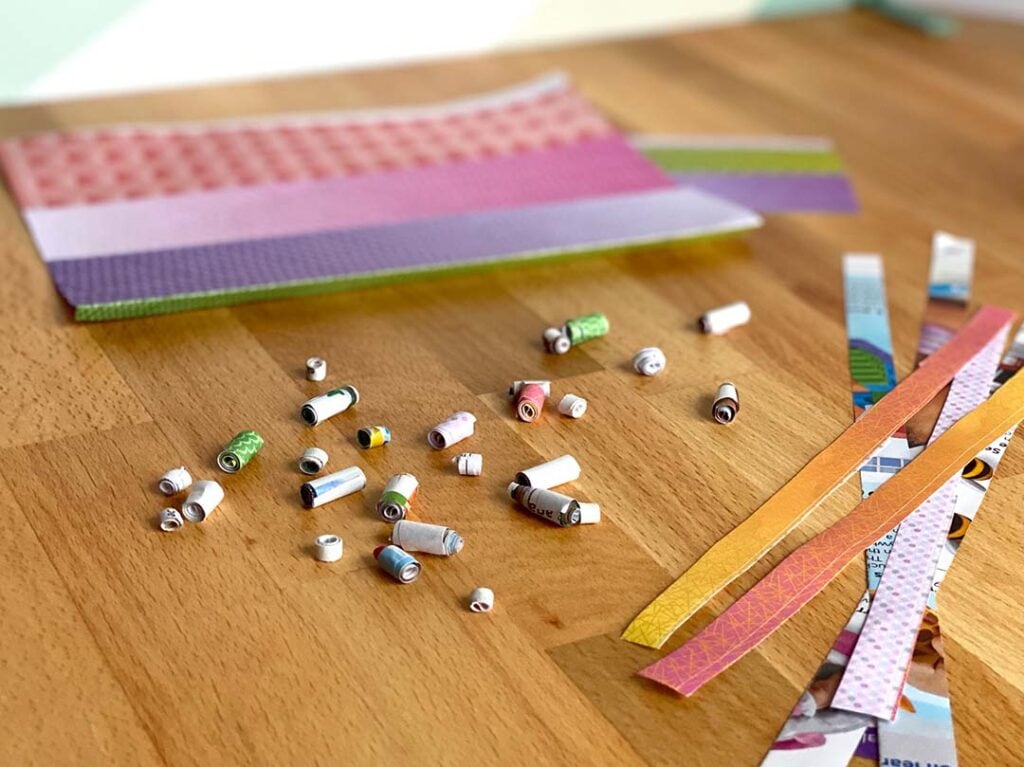
Cutting Paper Strips
The first step in your paper bead making process is cutting your scrap paper down into manageable strips. We have been using 1/2″ as our standard bead size, but we cut them all different widths to keep things visually interesting. My daughter even uses her hand crank paper shredder (which she LOVES playing with, by the way) to create smaller beads as spacers. Sometimes she cuts the strips herself, and sometimes we camp out at the guillotine paper cutter to bulk stock.
Keep in mind that the lengths of your paper shreds are going to depend entirely on the weight of the paper. For example, we use 11″ strips of copy weight paper. Whenever she uses something thicker, like some really quality scrapbooking paper, we only have to cut the strips 3″ long to get a nice solid bead. Which means that beautiful paper goes twice as far as well.
My daughter mixes her fancy papers with recycled paper from magazines and mail. I love the variety and instilling the idea of recycling and reusing our craft supplies. Also worth mentioning, the shape of your paper strips will determine the shape of your final bead. Play around with different styles to find your perfect bead shape.
Roll Your Paper Beads
Now that your paper strips are cut and ready to go, it’s time to make some paper beads! My 9 year old demonstrates the entire process in the video above, and it really is quite simple and fun.
- Insert the strip of paper between the metal prongs, decorative side up
- Hold the paper taut while you wind the bead up into the desired shape
- Dab or place a bead of glue on the tail end of the bead and press down firmly
- Allow the glue to dry a few moments. My ever-so-patient children count to 5.
- Pop the bead off and store it somewhere to dry fully.
- Rinse and repeat.
Store your beads in your bottle or crafting container of choice. Honestly, I think a pile of beautiful, handmade beads is a work of art in itself.
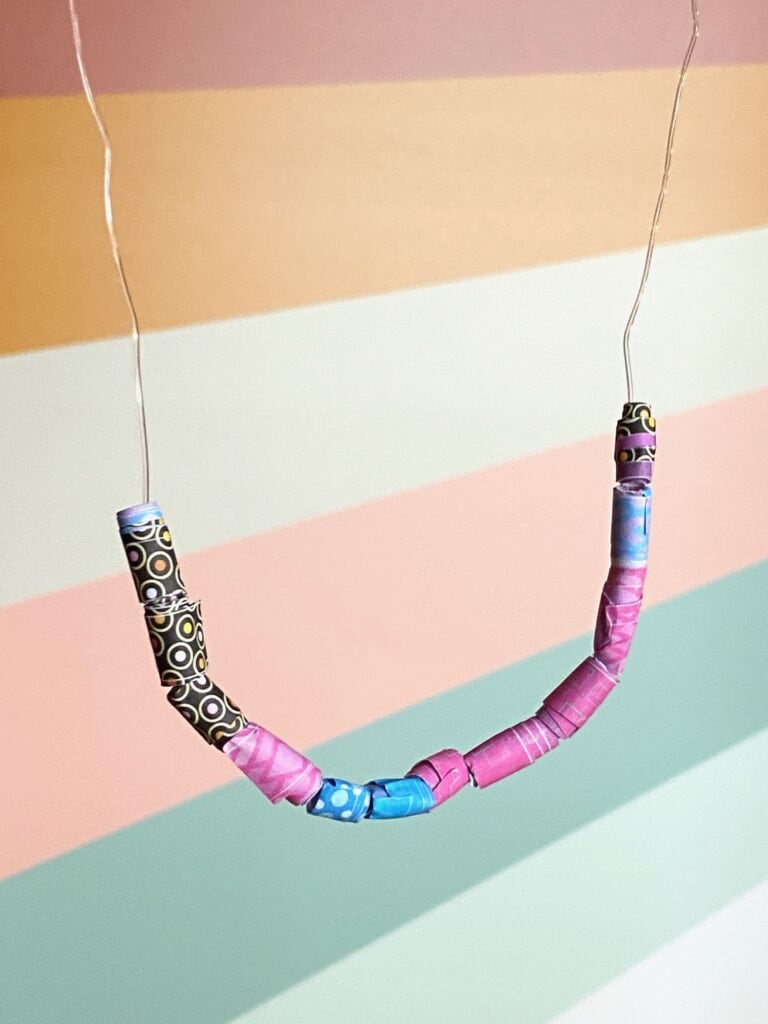
Create your paper bead art
Once you’ve got a nice little collection of paper beads, you can start turning your handmade beads into the art of your choice. If you decide to make jewelry, consider doubling up the elastic cord for longevity. You can also buy clasps and experiment with different closures and accessories.
A Household Hit
The Recycled Paper Bead Kit has been a hit around our house. My daughter finds the bead creation process to be very relaxing, and I’m happy to help her cut up her scraps and breathe new life into them. Even my 4 year old runs by to help her roll up the beads, though he needs help getting them started. The glue pen simplified things for her and made it a lot easier to get rolling quickly. She also appreciated have one less thing to worry about cleaning and keeping track of, even if the glue dabber was squishy and fun.
The suggested age for this kit is 5 and up. I tend to agree with that range, as long as folks realize that some 5 year olds may need a little extra assistance in the beginning to get the paper rolling.

More Crafting Kits
Interested in finding more creative inspiration and fun crafting kits? Don’t forget to check out our Complete Crafty Gift Guides! Our gift guides are overflowing with crafting kits, supplies, and inspiration to suit folks of all ages.
The products for this review were purchased and provided by me.

Links included above are affiliate links and may support DFW Craft Shows at no additional cost to you. DFWCS participates in the Amazon affiliate program, but DFWCS is in no way associated with Amazon or the items above. The opinions stated within are my own, and I have not received any sponsorship or free products from the aforementioned manufacturers.
Originally posted on January 30, 2022.
share


Hi, I'm Tania!
Thanks for stopping by DFW Craft Shows! Our blog is home to tons of creative inspiration, gift guides, tutorials, featured artists, and tips for small businesses trying to make their mark in the arts & crafts world.

